The first of this series, we had a django app code walk through, we discussed tons of stuffs which should be useful for building a ecommerce system with Django app. There were graphql apis to insert, update, products to the database, there were cron jobs to retrieve data from the database to the database, we also delved into setting up the RabbitMQ broker. We learnt how to create app in django.
You can find details on it in this video and code example in this page for part1 and part2
In this part we will see the following things to deploy django app.
- How to dockerize the django app
- Push it to container registry or docker hub
- Deploy the images to Kubernetes
- Create helm charts for deploying the images to the cluster
- Set up Jenkins on the cluster and creating pipelines to deploy the pods upon a push event
Dockerize Django app
After you have already written the code, the first step to move ahead is dockerize the app, this involves creating a dockerfile.
Here is the dockerfile of this app.
FROM python:3.6-slim
ENV PYTHONDONTWRITEBYTECODE 1
ENV PYTHONUNBUFFERED 1
RUN mkdir -p amazonish
WORKDIR /amazonish
RUN pip install --upgrade pip
COPY . /amazonish
COPY ./amazonish/requirements.txt .
RUN pip install -r requirements.txt
EXPOSE 8000
ENTRYPOINT ["./amazonish/entrypoint.sh"]
CMD ["python", "manage.py", "runserver", "0.0.0.0:8000"]
Considerable number of tasks are being implemented.
This includes:
- Getting the base python image on the top of which we will add our changes in the Django app
- Creating a directory inside the image we just imported from docker hub
- Upgrading the python package manager – Pip
- Copy all the files and folders from the root of the project in the repo to the directory we just created in container image
- Copy the requirements.txt to set up the python dependencies for running this project
- Exposing the container port and setting up an entry point for docker to start its execution
- Run the python command to start the Django app
Push your first django app to container registry or docker hub
Even though we are using GCP for this project, but I am not using container registry but docker hub. So, after dockerzing the app, we need to build it, tag it and push it to the docker hub so that we will set up Kubernetes on GCP we can use the image pull to deploy django app to Kubernetes cluster.
The command to build the app – docker build -t my_images:latest .
Deploy the images to Kubernetes
Creating a K8 cluster on GKE
It all starts with creating a cluster on the google cloud platform under Kubernetes engine. You can use the GUI but I use cli to create the cluster.
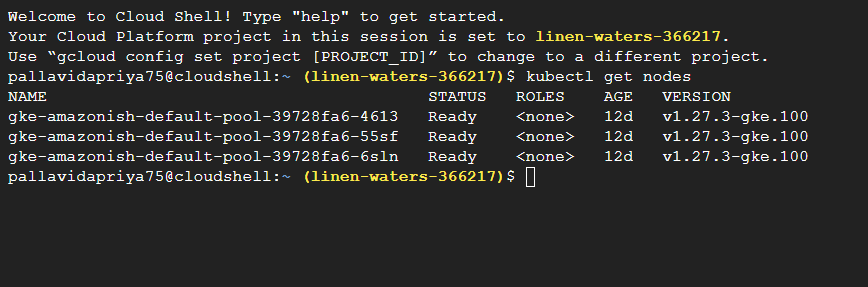
gcloud container clusters create [CLUSTER-NAME]Next you have to authenticate the cluster to peep inside.
gcloud container clusters get-credentials [CLUSTER-NAME]This will generate a kubeConfig entry to the cluster and you can test the connect by getting the nodes.
Before I move ahead, let me give some overview about the architecture how Kubernetes works.

As we can see, the client will send the endpoint request, and it will reach to concerned service routed through the ingress which is also a kind of load balancer which routes external request, to internal cluster Ips.
Now each service have replicas of pods inside it which actually hosts the dockerize django app. So far, pods are accessible from within the cluster, that’s why we have services and ingress to expose it outside world.
We will see all of this in action when we prepare the helm charts.
Create helm charts
First thing first, helm chart is a package manager for Kubernetes applications, and you have to install it.
It contains all the necessary resources to deploy an application to a Kubernetes cluster. This includes YAML configuration files for deployments, services, secrets, and config maps that define the desired state of your application.
A Helm chart packages together YAML files and templates. This means that Helm installs the whole dependency tree of a project if you run the install command for the top-level chart. You just a single command to install your entire application, instead of listing the files to install via kubectl.
Helm also keeps a release history of all deployed charts, so you can go back to a previous release if something went wrong.
So here we will create three helm charts as we will have a postgres, a django app and an ingress service.
If we focus on one of services, e.g. on django main app we can see that it needs to create two Kubernetes objects — ClusterIP & Deployment. If we go by usual kubectl approach then we will have to go through creating number of files, so we will helm.
helm create <chart-name>The above is the command we need to run to create the helm chart. After we run this command, we will get a set of dummy files which we out to delete and create our own files. We will not need generated files inside ./templates folder, so remove them and also clear all the content inside values.yaml.
Now for postgres, we need a deployment file, svc file, postgres-config, persistent volume yaml file. We will have to create the templates.
I have discussed all the helm chart separately. check that out.
After creating necessary helm resources, we will have to run few commands to create the resources on the Kubernetes cluster.
helm upgrade --install releasename ./helmchartfoldername - This will install the chart on  the cluster
helm list - This will show all the helm releases
kubectl get deployments - Gives all the deploying and whether they are in running mode or not
There are couple of steps that we want to do before moving ahead for verifying the resource creating correctly, I have congregated the same in a separate post. check that out.
Set up Jenkins on the cluster
Technically, if you have followed along the above steps correctly, then you should be seeing the database connected to the app and app UI and graphql service running on their configured endpoint. This is an additional step where we will automate the process of deploying django app on the pods in the cluster through helm, docker, kubectl using jenkins CI cd pipeline.
podTemplate(label: 'mypod', serviceAccount: 'cd-jenkins', containers: [
containerTemplate(
name: 'docker',
image: 'docker',
command: 'cat',
resourceRequestCpu: '100m',
resourceLimitCpu: '300m',
resourceRequestMemory: '300Mi',
resourceLimitMemory: '500Mi',
ttyEnabled: true
),
containerTemplate(
name: 'kubectl',
image: 'allanlei/kubectl',
resourceRequestCpu: '100m',
resourceLimitCpu: '300m',
resourceRequestMemory: '300Mi',
resourceLimitMemory: '500Mi',
ttyEnabled: true,
command: 'cat'
),
containerTemplate(
name: 'helm',
image: 'alpine/helm:3.13.2',
resourceRequestCpu: '100m',
resourceLimitCpu: '300m',
resourceRequestMemory: '300Mi',
resourceLimitMemory: '500Mi',
ttyEnabled: true,
command: 'cat'
)
],
volumes: [
hostPathVolume(mountPath: '/var/run/docker.sock', hostPath: '/var/run/docker.sock'),
]
) {
node('mypod') {
def REPOSITORY_URI = "pallavy57/amazonishapp_v2"
def HELM_APP_NAME_1 = "amazonishv2"
def HELM_CHART_DIRECTORY_1 = "helm/postgres"
def HELM_APP_NAME_2 = "amazonishv2app"
def HELM_CHART_DIRECTORY_2 = "helm/app"
def HELM_APP_NAME_3 = "ingress-service"
def HELM_CHART_DIRECTORY_3 = "helm/ingress"
stage('Get latest version of code') {
checkout scm
}
stage('Check running containers') {
container('docker') {
sh 'hostname'
sh 'hostname -i'
sh 'docker ps'
sh 'ls'
}
container('kubectl') {
sh 'kubectl get pods -n default'
}
container('helm') {
sh 'helm repo add stable https://charts.helm.sh/stable'
sh 'helm repo update'
}
}
stage('Build Image'){
container('docker'){
withCredentials([usernamePassword(credentialsId: 'docker-hub', usernameVariable: 'USERNAME', passwordVariable: 'PASSWORD')]) {
sh 'docker login --username="${USERNAME}" --password="${PASSWORD}"'
sh "docker build -t ${REPOSITORY_URI}:${BUILD_NUMBER} ."
sh 'docker image ls'
}
}
}
stage('Push Image'){
container('docker'){
withCredentials([usernamePassword(credentialsId: 'docker-hub', usernameVariable: 'USERNAME', passwordVariable: 'PASSWORD')]) {
sh 'docker image ls'
sh "docker push ${REPOSITORY_URI}:${BUILD_NUMBER}"
}
}
}
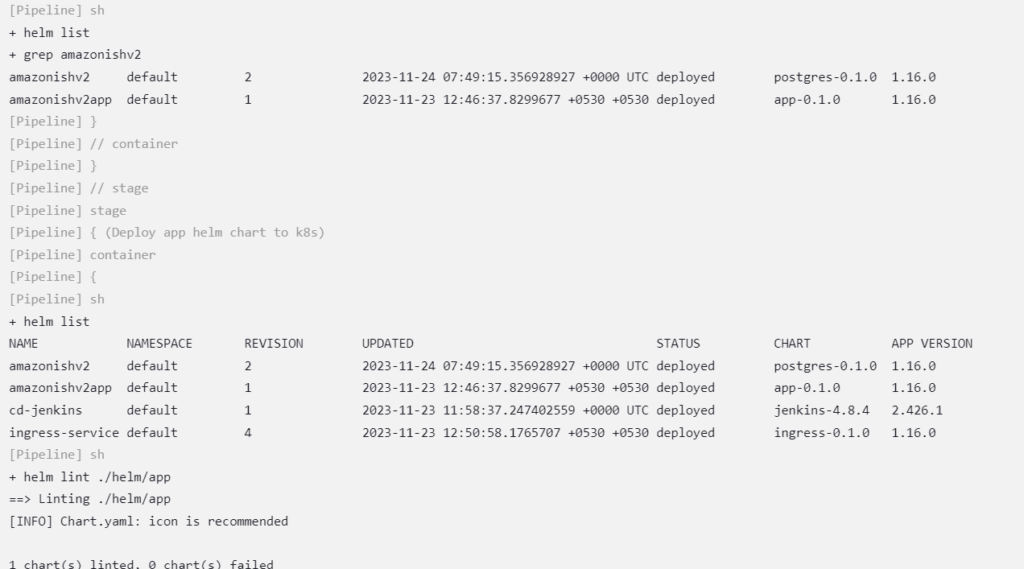
stage('Deploy postgres helm chart to k8s'){
container('helm'){
sh 'helm list'
sh "helm lint ./${HELM_CHART_DIRECTORY_1}"
sh "helm upgrade --set image.tag=${BUILD_NUMBER} ${HELM_APP_NAME_1} ./${HELM_CHART_DIRECTORY_1}"
sh "helm list | grep ${HELM_APP_NAME_1}"
}
}
stage('Deploy app helm chart to k8s'){
container('helm'){
sh 'helm list'
sh "helm lint ./${HELM_CHART_DIRECTORY_2}"
sh "helm upgrade --set image.tag=${BUILD_NUMBER} ${HELM_APP_NAME_2} ./${HELM_CHART_DIRECTORY_2}"
sh "helm list | grep ${HELM_APP_NAME_2}"
}
}
stage('Deploy Image to k8s'){
container('helm'){
sh 'helm list'
sh "helm lint ./${HELM_CHART_DIRECTORY_3}"
sh "helm upgrade --set image.tag=${BUILD_NUMBER} ${HELM_APP_NAME_3} ./${HELM_CHART_DIRECTORY_3}"
sh "helm list | grep ${HELM_APP_NAME_3}"
}
}
}
}I have set up the Jenkins server on the cluster itself. The process is simple.
We have to install helm on the cluster first.
curl https://baltocdn.com/helm/signing.asc | sudo apt-key add -
sudo apt-get install apt-transport-https --yes
echo "deb https://baltocdn.com/helm/stable/debian/ all main" | sudo tee /etc/apt/sources.list.d/helm-stable-debian.list
sudo apt-get update
sudo apt-get install helm
To give yourself cluster administrator permission in the cluster’s RBAC, run
kubectl create clusterrolebinding cluster-admin-role --clusterrole=cluster-admin --user=$(gcloud config get-value account)Run the following command to install Jenkins on the Kubernetes cluster via Helm Chart in one shot, and create a jenkins folder to set the values for the chart.
helm repo add jenkinsci https://charts.jenkins.io
helm repo update
mkdir jenkins && cd jenkins && vi values.yaml

controller:
  installPlugins:
    - kubernetes:latest
    - workflow-job:latest
    - workflow-aggregator:latest
    - credentials-binding:latest
    - git:latest
    - google-oauth-plugin:latest
    - google-source-plugin:latest
    - google-kubernetes-engine:latest
    - google-storage-plugin:latest
  resources:
    requests:
      cpu: "50m"
      memory: "1024Mi"
    limits:
      cpu: "1"
      memory: "3500Mi"
  javaOpts: "-Xms3500m -Xmx3500m"
  serviceType: ClusterIP
agent:
  resources:
    requests:
      cpu: "500m"
      memory: "256Mi"
    limits:
      cpu: "1"
      memory: "512Mi"
persistence:
  size: 100Gi
serviceAccount:
  name: cd-jenkins

helm install cd-jenkins -f jenkins/values.yaml jenkinsci/jenkins --wait
or you can search a helm repo for Jenkins and install the repository and supply the name of the repo when you are injecting the values. And you have to do this in the cloud shell of GCP directly.
Next, Configure the Jenkins service account to be able to deploy to the cluster
kubectl create clusterrolebinding jenkins-deploy --clusterrole=cluster-admin --serviceaccount=default:jenkins-toolIf you get the service using kubectl command you will get a loadbalancer external IP, you can use that IP to access the Jenkins UI.
After that go to the Jenkins UI > Manage Jenkins > Credentials > Give docker hub and GitHub credentials. Then go to the Clouds section and access the cloud and configure Jenkins to Kubernetes cluster on GCP by supplying the Kubernetes URL.
Now Kubernetes is connected to Jenkins (provided you installed Kubernetes plugin as well).
Its time to create the job, its simple because you already have the Jenkins file where we have defined the pod-template. Just supply the GitHub link in the pipeline created job and configure the event for push and you are good to go.
I hope this help! I will have a video as well to demonstrate stuffs so stay tuned.